

Landing Page
The Webfuse Landing Page serves as a customizable entry point to a Space’s Sessions, designed to provide essential pre-session information, gather user consent, or enforce authentication and compliance requirements. You can leverage Webfuse Studio’s Landing Page editor to design a landing experience, or upload fully custom HTML, CSS, and JavaScript to ensure a seamless transition into the session.
Webfuse offers two types of Landing Pages:
- Default Landing Page – A simple, configurable page with customizable text, colors, and images.
- Custom Landing Page – A fully customizable page where you can upload your own HTML and assets.
Default Landing Page
Section titled “Default Landing Page”The default Landing Page provides an easy way to create a a Landing Page with the Landing Page editor.
Customise Default Landing Page
Section titled “Customise Default Landing Page”- Navigate to your Space and click on the Landing Page tab.
- Click on the Customise button.
- Ensure Default is selected in the sidebar.
- Modify the Landing Page settings as needed.
- Click on Save button.
- Make sure to toggle Enable Landing Page to On.
You can Customise:
- Title - The main heading of your Landing Page.
- Description - A longer text explaining your application.
- Button Text - Custom text for the action button.
- Colors - Background color, text color, button color, and button text color.
- Logo - Upload your company or application logo.
- Background Image - Add a custom background image.
All changes are previewed in real-time on the right side of the editor.
Custom Landing Page
Section titled “Custom Landing Page”For more advanced customization, you can create a fully custom Landing Page using your own HTML, CSS, and JavaScript.
Create Custom Landing Page
Section titled “Create Custom Landing Page”Prepare your Landing Page files locally, ensuring you have an index.html file as the entry point.
- Navigate to your Space and click on the Landing Page tab.
- Click on the Customise button.
- Ensure Custom is selected in the sidebar.
- Select your Storage App.
- Click on Upload a directory button if you want to upload your custom landing page form your local file system.
- Click on the Save button.
- Make sure to toggle Enable Landing Page to On.
You have an option to select the Webfuse Storage App or install your own. Currently only S3 compatible storage is supported.
Custom Landing Page Requirements
Section titled “Custom Landing Page Requirements”- Your directory must include an
index.htmlfile as the entry point. - Keep file paths relative within your HTML and CSS files.
- For optimal performance, minimize file sizes and optimize images.
- Ensure your design is responsive for different screen sizes.
Use Your Own S3 Storage App
Section titled “Use Your Own S3 Storage App”- Upload your Landing Page files directly to your S3 bucket
- In the Custom Landing Page editor, select your S3 Storage app
- Click on Enter a directory path in your storage and provide the path to the directory
- Click Save to reference your uploaded files
- Your custom Landing Page will be previewed in the editor
For best practices, we recommend building your project locally first and then uploading the built files. This ensures optimal performance and allows you to test your Landing Page thoroughly before deploying it.
Environment Variables
Section titled “Environment Variables”To set environment variables for your Custom Landing Page:
- In the Custom Landing Page editor, scroll to the Environment Variables section
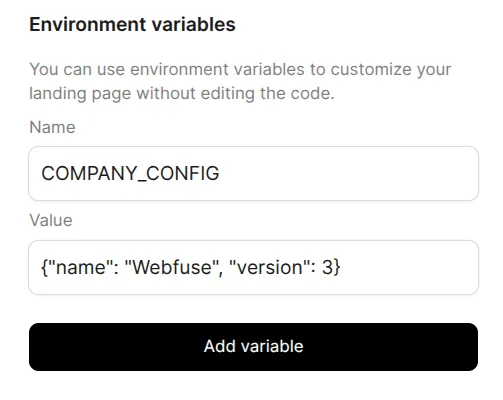
- Click Add Variable to add a new environment variable
- Enter the variable name (e.g.,
COMPANY_CONFIG) - Enter the value
- Click Save to apply the changes
After saving the environment variables, the new values will be automatically applied. You can use environment variables in your custom Landing Page to make it dynamic and customizable. Environment variables are replaced with their actual values when your Landing Page is served.
Basic Usage
Section titled “Basic Usage”Use the {{.VARIABLE_NAME}} syntax to insert environment variables in your HTML, CSS, or JavaScript files:
<h1>Welcome to {{.COMPANY_NAME}}</h1><p>Contact us at {{.CONTACT_EMAIL}}</p><div>Current version: {{.App_VERSION}}</div>Reserved Environment Variables
Section titled “Reserved Environment Variables”Webfuse automatically provides two reserved environment variables that are always available in your custom Landing Page:
WEBFUSE_SPACE_ID– The unique identifier of your SpaceWEBFUSE_WIDGET_KEY– The widget key associated with your Space
These variables are automatically set and cannot be overridden. You can use them to initialize the Webfuse widget:
Environment Variable Storage
Section titled “Environment Variable Storage”Environment variables are stored and returned as strings and can be used in different ways:
HTML Context
Section titled “HTML Context”Text/Strings :
<p>{{.GREETING}}</p><!-- If GREETING = "Hello World", renders as: --><p>Hello World</p>Numbers (stored as strings):
<p>Timeout: {{.TIMEOUT_MS}}ms</p><!-- If TIMEOUT_MS = "5000", renders as: --><p>Timeout: 5000ms</p>Boolean values (stored as strings):
<p>Debug mode: {{.DEBUG_MODE}}</p><!-- If DEBUG_MODE = "true", renders as: --><p>Debug mode: true</p>JSON Objects and Arrays (stored as strings):
<p>Config: {{.CONFIG}}</p><!-- If CONFIG = {"theme": "dark", "lang": "en"}, renders as: --><p>Config: {"theme": "dark", "lang": "en"}</p>JavaScript Context
Section titled “JavaScript Context”JSON Objects and Arrays (stored as strings):
const config = JSON.parse('{{.CONFIG}}');const features = JSON.parse('{{.FEATURES}}');// If CONFIG = {"theme": "dark", "lang": "en"}, FEATURES = ["chat", "video", "screen-share"], renders as:const config = {"theme": "dark", "lang": "en"};const features = ["chat", "video", "screen-share"];Nested Object Access
Section titled “Nested Object Access”In JavaScript context, you can access properties within objects using JSON.parse native function:
const config = JSON.parse('{{.CONFIG}}');const features = JSON.parse('{{.FEATURES}}');const title = config.title;const theme = config.theme;const language = config.language;const primaryFeature = features[0];Example
Section titled “Example”PAGE_TITLE=My PageHEADING=Welcome to My PageAPI_URL=https://api.example.comCONFIG={"theme": "dark", "features": ["chat", "video"]}DEBUG=true<!DOCTYPE html><html><head> <title>{{.PAGE_TITLE}}</title></head><body> <h1>{{.HEADING}}</h1> <script> const apiUrl = "{{.API_URL}}"; // String value, quoted in JavaScript context const config = JSON.parse('{{.CONFIG}}'); // JSON string converted to object, quoted in JavaScript context const isDebug = JSON.parse('{{.DEBUG}}'); // String value converted to boolean, quoted in JavaScript context </script></body></html>Caching Considerations
Section titled “Caching Considerations”The platform implements caching to improve performance for your custom Landing Pages:
- All files except
index.htmlare cached for 7 days. - When uploading newer versions of your Landing Page, make sure to version your built files (e.g., by adding a query parameter like
style.css?v=2or using a hash in filenames likestyle.123abc.css). - This versioning approach ensures users get the latest version of your assets without waiting for the cache to expire.
Meeting Space Landing Pages
Section titled “Meeting Space Landing Pages”When using a Landing Page for a meeting Space, you may want to control whether users see the Landing Page on every visit or only once per Session.
Default Landing Page Behavior
Section titled “Default Landing Page Behavior”For Default Landing Pages, Webfuse automatically manages this by setting a cookie when a user first accesses the Landing Page:
- The Landing Page displays on the user’s first visit to the Space.
- When the user enters the meeting, a cookie is set.
- On page refresh, the Landing Page is skipped and users go directly to the meeting.
- When a new Session starts, the Landing Page displays again.
This behavior ensures users see important information on first entry while avoiding repetition during the same Session.
Custom Landing Page Behavior
Section titled “Custom Landing Page Behavior”For Custom Landing Pages, you can control whether to show or skip the Landing Page by using the same cookie mechanism:
The cookie is named landing_page_<space_slug>_<session_id>, where:
<space_slug>– Your Space’s slug identifier<session_id>– The unique Session identifier
Example – Skip Landing Page After First Visit
Section titled “Example – Skip Landing Page After First Visit”To replicate the default behavior in your Custom Landing Page, set the cookie when the user clicks your “Join Session” button:
const expiresInAnHour = new Date(Date.now() + 60 * 60 * 1000);document.cookie = `landing_page_<space_slug>_<session_id>=true; path=/; expires=${expiresInAnHour.toUTCString()}`;Since the session_id is unique per Session, starting a new Session will show the Landing Page again even if the cookie was set in a previous Session.