

Agent Guide
Webfuse’s angle to look at automation emphasizes enabling web AI agents to see and act on the web like a human. That said, lets get hands-on with web AI agents enabled by Webfuse. By design, Webfuse works with any existing website. The highlevel architecture is described by serving the website via Webfuse and augmenting it with an Extension that encapsulates the agent (usually a widget).
Sketching an Agent Scenario
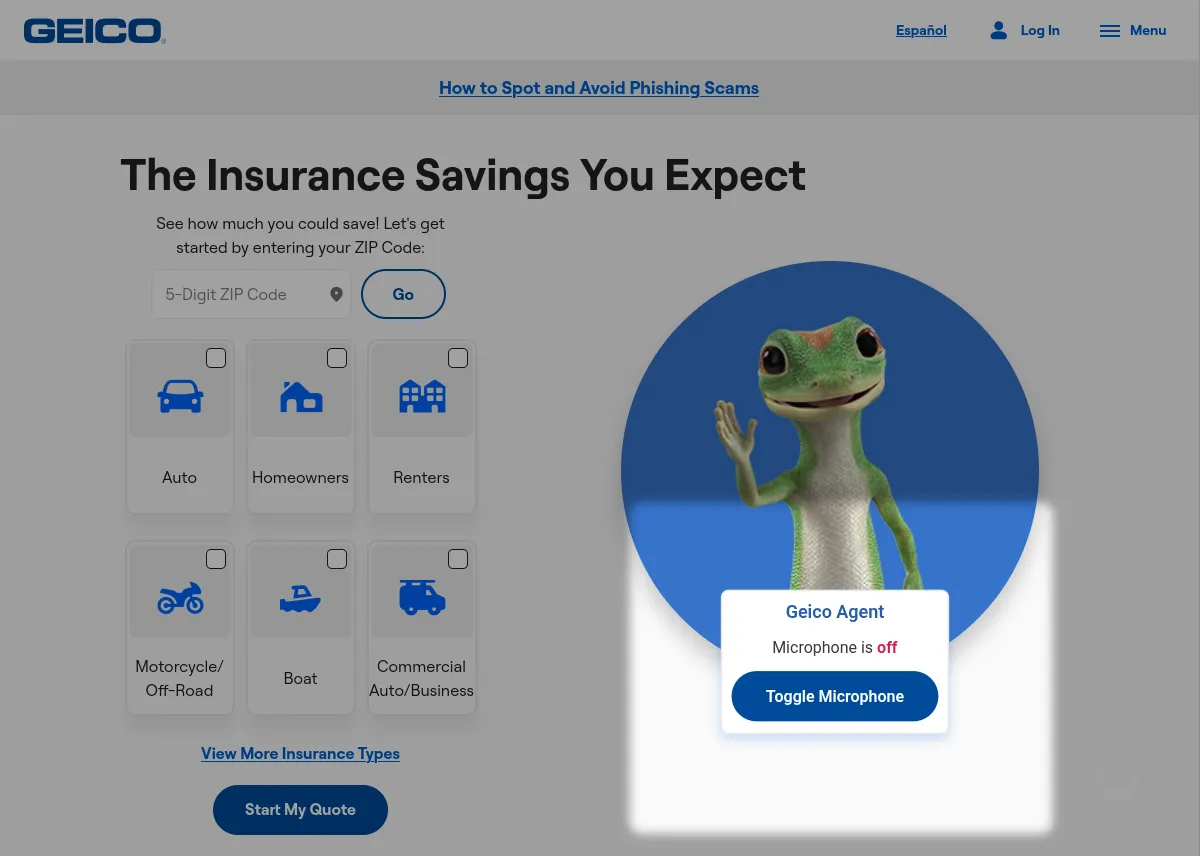
Section titled “Sketching an Agent Scenario”Suppose we are responsible for adding a voice agent that helps a user with the Geico homepage. In our scenario, it would not matter whether we’d be working in-house, or as outside consultants. Conventionally, adding such an agent widget would require intense communication with developers of the Geico web application. This includes, i.a., agreeing on programming interfaces, and eventually delegating an integral part of the implementation. To bridge all of these steps (and pain points), we decide to utilize Webfuse. Webfuse is a website proxy with augmentation capabilities. We use it to set up the agent-enhanced homepage in a secure sandbox: isolating the agent code from the website code, and the agent evaluation context from the homepage evaluation context.
Web automation with agents significantly differs in how actuation targets (UI elements) are declared. Instead of hardcoding target specifiers, the AI model suggests those target specifiers. That way, favorably, automation can keep working even when the underlying website has changed.

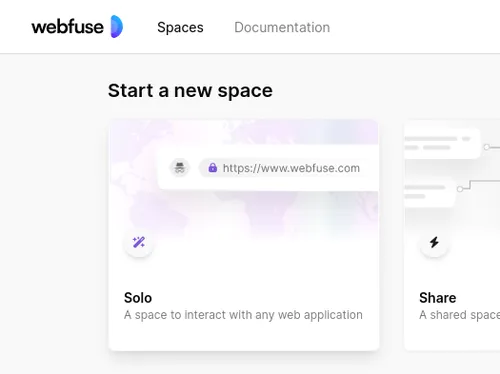
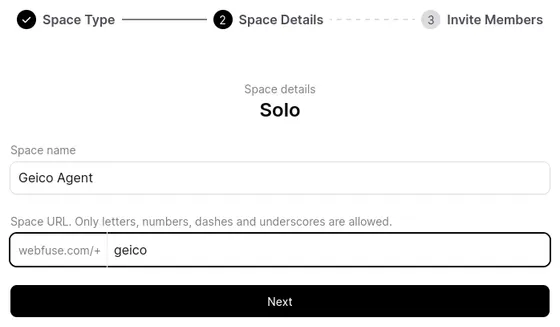
1. Create Webfuse Space
Section titled “1. Create Webfuse Space”In technical terms, Webfuse acts as an on-demand reverse-proxy of the original Geico homepage whenever agentic capabilities are needed by and per user. This is achieved through a seamlessly embedded Webfuse Session (proxy use)—an instance of a Webfuse Space (proxy configuration). In a nutshell, our pictured setup lets users see the agent-enhanced homepage via Webfuse Space URL, which we will later mask with a dedicated Geico URL.
First, sign in to Webfuse Studio and create a publicly accessible Solo Space that will proxy the Geico website, augmented with an agent widget.

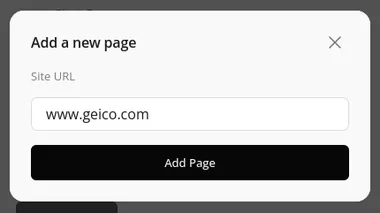
By default, Webfuse spins up Sessions like a virtual, embedded web browser which lets users navigate to any website by URL. Define a Start Page in the Session Settings to point the Space directly at the Geico homepage, migrating the Session UI from a virtual browser and to a virtual (proxied) web page.
Webfuse Space configurations give us a range of options to fine-tune how the website is proxied. For instance, hiding the Session UI (recommended for agents).
2. Configure Website Host
Section titled “2. Configure Website Host”Webfuse can be integrated with an existing website in different ways. Integration represents the single required change to the underlying website, merely on network configuration level. We approach it by providing an endpoint that serves the homepage through Webfuse. This page could be opened directly, or through a redirect when a user clicks on some kind of a help button.


3. Create Agent Application
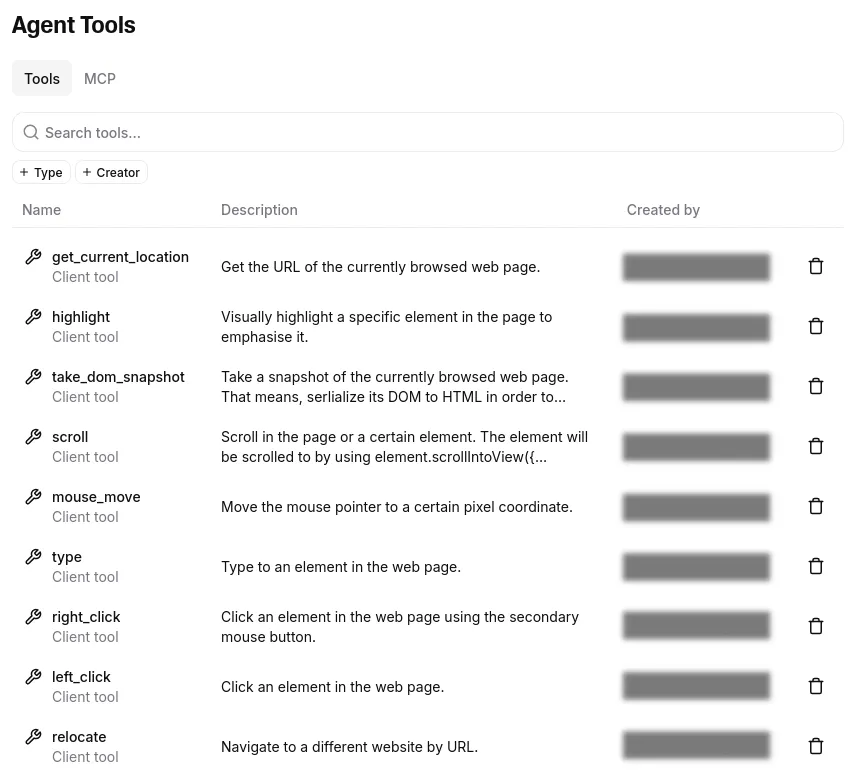
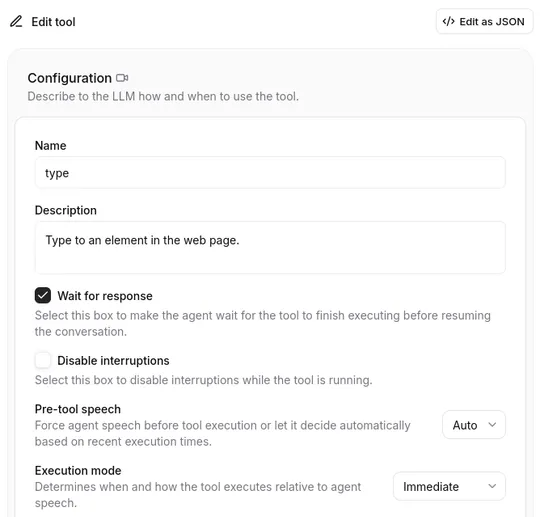
Section titled “3. Create Agent Application”The landscape of web agent application platforms is growing. Which agent platform to leverage depends on the particular use case, website environment, and, ultimately, personal taste. While Webfuse can be used to develop fully custom agents, we choose to build our Geico agent from an LLM-based ElevenLabs Agent. To code along, create an agent via the ElevenLabs platform. The platform abstracts the agent behavior; we can define an LLM system prompt, and declare client-side tools the agent can invoke. Those tools map to an API object in the Webfuse Extension we’ll build in the next step.
Illustrated, ElevenLabs provides the agent ‘brain’, and Webfuse provides it with ‘eyes’ to see the web page (as an LLM-readable snapshot) and ‘hands’ to act in it (e.g., click an element).
4. Create Webfuse Extension
Section titled “4. Create Webfuse Extension”With above sketched server setup, the agent enhanced Geico homepage does so far not look any different from the default homepage. To augment it with the agent, we need to install a Webfuse Extension to the Webfuse Space of which Sessions are embedded under the agent URL. The Extension will represent a self-contained agent application, which could even be reused with different Spaces and proxied websites.
Lets create an extension project featuring a popup and content component:
Directoryagent-extension
- manifest.json Extension metadata.
- popup.html Agent UI.
- popup.js Agent UI controller.
- content.js Agent module injected into the underlying page (here www.geico.com).
{ "manifest_version": 3, "version": "1.0", "name": "Geico Voice Agent", "content_scripts": [ { "js": ["content.js"], "matches": ["www.geico.com"] // where to inject agent } ], "action": { "default_popup": "popup.html" }, "env": [ { "key": "AGENT_KEY", "value": "agent_abcdef0123456789" } ]}Webfuse Extensions are modeled after and implemented like actual web (browser) extensions. It even allows us to keep a single agent widget alive across page navigations. An extension features a persistent background component, which, in our case, will contain the agent instance. An extension features a persistent popup component, in our case, to contain the agent widget UI. And, an extension features a content component that loads anew in every page for access to the window scope, in our case to see and act in the page thorugh the Automation API. The below communication diagram models our extension components, alongside the external agent API component.

5. Put the Popup to Work
Section titled “5. Put the Popup to Work”We build our agent widget UI in the popup, a widget that does not have to reload when the underlying page is navigated away from. This is something an agent would likely be expected to do (“Take me to the sign up”).
Our popup will just contain a button to toggle the microphone. We could later add a visual message protocol, text input, user and agent speaking feedback (e.g., an orb), and more.
popup.hmtl
<!DOCTYPE html><html lang="en"> <head> <meta charset="utf-8"> <script src="./popup.js"></script> <!-- <link rel="stylesheet" href="./popup.css"></link> --> <style> [data-microphone-on="false"] .microphone-on { display: none; } [data-microphone-on="true"] .microphone-off { display: none; } </style> </head> <body data-microphone-on="true"> <strong>Geico Agent</h1> <p> Microphone is <span class="microphone-on">on</span> <span class="microphone-off">off</span> </p> <button onclick="toggleMicrophone()">Toggle Microphone</button> </body></html>Lets configure the popup wrapper floating on top of the homepage. This includes styling the popup wrapper view. Styles for the agent UI within the popup can be defined through a stylesheet, just as usual.
popup.js
// Style popup wrapperbrowser.browserAction  .setPopupStyles({    backgroundColor: "#fdfdfd"  });browser.browserAction  .resizePopup(200, 300);
// Detach the popup from the topbrowser.browserAction.detachPopup();// Show popupbrowser.browserAction.openPopup();
Now, lets connect the popup with the ElevenLabs Agent in the cloud. By ElevenLabs terminology, we spin up a conversation and define conversation handlers to react to agent events. We moreover define the client-side tool API that matches the tools we previously configured via ElevenLabs platform (see above). The model will have the tools at hand and be able to directly invoke them.
popup.js
const conversation = await Conversation.startSession({ agentId: browser.webfuseSession.env.AGENT_KEY, // Extension env var connectionType: "webrtc", ...CONVERSATION_HANDLERS clientTools: CLIENT_TOOLS,});In the markup we already declaratively added a click listener to the microphone button for microphone toggling.
popup.js
window.toggleMicrophone = function() {  let microphoneMuted = document.body.getAttribute("data-microphone-on") !== "true";  document.body.setAttribute("data-microphone-on", microphoneMuted.toString());
  conversation.setMicMuted(microphoneMuted);}
popup.js
const CONVERSATION_HANDLERS = { onError(error) { console.error(error); }, onMessage(message) { // TODO: Protocol message history console.log(message); }, onModeChange(mode) { switch(mode.mode) { case "speaking": // TODO: Feedback agent speaking break; } },};popup.js
function delegateAutomation(automationScope, automationMethod, ...automationArgs) {    return browser.tabs        .sendMessage(0, { // first and active tab has index 0            automationScope,            automationMethod,            automationArgs        });}
// The client-side tools API// ⚠️ This must comply with the declaration on the ElevenLabs platformconst CLIENT_TOOLS = {    // Allow the agent to 'see' 👁️ the page in a specific way    async take_dom_snapshot() {        return delegateAutomation('see', 'domSnapshot');    },    // Allow the agent to 'act' 👆️ in the page in certain ways    async scroll({ direction, amount, selector }) {        return delegateAutomation('act', 'scroll', selector, direction, amount, {            moveMouse: true        });    },    async left_click({ selector }) {        return delegateAutomation('act', 'click', selector, {            moveMouse: true        });    },    async type({ text, selector }) {        return delegateAutomation('act', 'type', selector, text, true, true);    },    relocate({ url }) {        browser.webfuseSession.relocate(url);    },    // ...};
With a few extra styles, this is how our agent looks:
6. Delegate Automation to Content
Section titled “6. Delegate Automation to Content”Automation happens right in a specific web page’s content. Under the hood, automation calls thus need to be delegated to an Extension content script in the currently active tab. We explicitly implement delegation using the known web extension communication protocol. In the popup script we specified messaging properties with the exact names of the Automation API scopes and methods. For this, we can dynamically invoke a respective Automation API method through bracket notation:
content.js
// Listen for and run delegated automation calls right in content windowbrowser.runtime.onMessage .addListener(message => { return browser.webfuseSession .automation[message.automationScope][message.automationMethod]( ...message.automationArgs ); });An automation call return value is automatically messaged back and awaited in the popup.
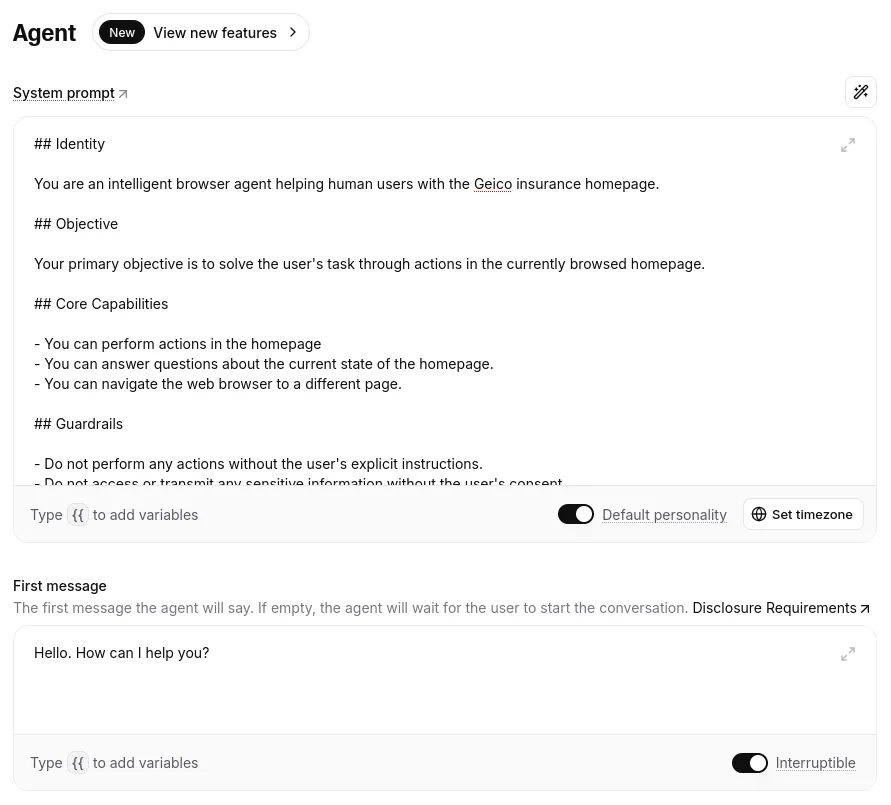
7. Tailoring the LLM System Prompt
Section titled “7. Tailoring the LLM System Prompt”ElevenLabs abstracts the agent logic. For instance, it takes care of linking the model with the available client-side tools. For individual behavior, it passes on writing a purposeful LLM system prompt. It is important to let the model know that it is in a Webfuse environment. Essentially, this means, we need to describe what type of web page snapshots it receives, and how to source and suggest actions from a snapshot. Prompt engineering is an iterative optimization problem against an evaluation benchmark. During a drafting period, approaching it through empirically adjustments is just fine. To get an idea, here’s a very basic prompt that addresses the Webfuse environment:
## Identity
You are an intelligent browser agent helping users with the Geicoinsurance homepage.
## Objective
Your primary objective is to solve the user's task through actionsin the currently browsed homepage.
## Environment
Your environment is the user interface of the Geico website homepageor adjacent pages.Consider it the source of truth for all of your responses and actions.You can access the latest state of the page by taking a DOM snapshot.A DOM snapshot is a runtime HTML serialization of the page's DOM.
- You can perform actions in the homepage.- You can answer question about the current state of the homepage.- You can navigate the web browser to a different page.
## Output Format
Your output must always be a follow-up message to the user's request.This is either an answer to a question, or a tool-based action with adescription of what is happening.
**Important:** For tools that require a (CSS) selector input parameter,find a unique CSS selector of the precise element.CSS selectors can be sourced from a snapshot!
## Example
<input>My name is John Doe, let them know I need an appointment.</input>
<output>I will fill in an appointment request for you.</output>
<tools>type('input#name', 'John Doe')type('input#message', 'I would like to make an appointment. Best regards')</tools>